Project Overview

Facenet-PyTorch delivers an end-to-end face detection and recognition pipeline built on PyTorch. It combines an efficient MTCNN detector with pretrained Inception Resnet V1 models to simplify building applications that need accurate face embeddings, classification, and fine-tuning.
Purpose
Provide developers with a ready-to-use toolkit for:
- Detecting faces in images and video streams
- Generating 512-dimensional face embeddings
- Classifying or clustering identities
- Fine-tuning models on custom datasets
- Deploying production-ready pipelines via Docker and example notebooks
Core Features
- MTCNN Face Detector
Multi-stage convolutional network for fast, accurate face and landmark detection. - Inception Resnet V1 Embedding
Pretrained on VGGFace2 or CASIA-Webface; outputs 512-d embeddings for recognition. - Recognition Pipelines
Tools for nearest-neighbor classification, clustering, and threshold-based identification. - Fine-tuning Support
Easy integration into training loops to adapt models to new identities. - Video & Batch Processing
Real-time face tracking and batch inference utilities for streams and folders. - Docker & Notebooks
Example Jupyter notebooks and Dockerfiles accelerate deployment and reproducibility.
Typical Use-Cases
- Access Control & Security
Real-time identification at checkpoints or entry systems. - Attendance Systems
Automated logging of participants in classrooms, events, or workplaces. - Photo Management
Face clustering and tagging in large image collections. - Custom Authentication
Integrate with mobile or web apps for biometric login. - Research & Prototyping
Benchmark new architectures or datasets using a standardized pipeline.
Quick Start Example
from PIL import Image
from facenet_pytorch import MTCNN, InceptionResnetV1

# Initialize detector and embedding model
mtcnn = MTCNN(keep_all=False, device='cuda')
resnet = InceptionResnetV1(pretrained='vggface2').eval().to('cuda')

# Load image and detect face
img = Image.open('input.jpg')
face = mtcnn(img)

# Generate embedding
if face is not None:
    embedding = resnet(face.unsqueeze(0).to('cuda'))
    print('Face embedding shape:', embedding.shape)
This minimal snippet detects a single face and prints its 512-dim embedding. For advanced pipelines and deployment options, refer to the example notebooks and Docker configurations.
Getting Started
Start detecting and recognizing faces with facenet-pytorch in minutes. This guide covers environment requirements, installation methods (pip, source, Docker) and a 10-line “detect & recognise” example.
Requirements
• Python 3.6+
• PyTorch ≥1.0, torchvision
• NumPy, Pillow
• (Optional GPU) CUDA 10.1+ compatible driver
Installation
1. Via pip
pip install facenet-pytorch
2. From source
git clone https://github.com/timesler/facenet-pytorch.git
cd facenet-pytorch
pip install -e .
3. With Docker
# Build image
docker build -t facenet-pytorch .
# Run container with GPU support
docker run --gpus all -v $(pwd)/data:/data facenet-pytorch \
    python - << 'PYCODE'
from facenet_pytorch import MTCNN, InceptionResnetV1
print("Ready for inference")
PYCODE
Quickstart: Detect & Recognise (10 lines)
This snippet detects faces in input.jpg, computes embeddings, and compares them to a stored reference embedding.
from facenet_pytorch import MTCNN, InceptionResnetV1
import torch
from PIL import Image

device = 'cuda' if torch.cuda.is_available() else 'cpu'
mtcnn = MTCNN(keep_all=True, device=device)
resnet = InceptionResnetV1(pretrained='vggface2').eval().to(device)

img = Image.open('input.jpg')
faces, probs = mtcnn(img, return_prob=True)                         # Detect & crop
embeddings = resnet(faces.to(device))                               # Compute embeddings
known = torch.load('known_embedding.pt').to(device)                  # Reference embedding
distances = (embeddings - known).norm(dim=1)                         # L2 distances
best_idx = distances.argmin().item()
print(f"Best match face #{best_idx} (distance: {distances[best_idx]:.2f})")
Next steps: fine-tune on custom datasets, build classification pipelines, or integrate into video streams.
Core Concepts & API Reference
MTCNN.detect: Retrieving Bounding Boxes and Facial Landmarks
Provide a low-level interface to run MTCNN’s P-, R- and O-nets on one or more images, returning face bounding boxes, detection probabilities, and optional 5-point landmarks.
Signature
boxes, probs[, points] = mtcnn.detect(imgs, landmarks=False)
Parameters
• imgs
– PIL.Image, numpy.ndarray (H×W×3 uint8), torch.Tensor (H×W×3 or B×H×W×3), or list of equal-sized PIL.Images
• landmarks (bool)
– If True, returns facial landmarks as an N×5×2 array
Returns
• boxes
– numpy.ndarray of shape N×4 for single image, or list of such arrays for batch. Each row is (x1, y1, x2, y2)
• probs
– 1-D array of length N with face confidence scores
• points (optional)
– N×5×2 array of floating-point coordinates for left eye, right eye, nose, left mouth, right mouth
Details
• No faces found → boxes is empty array, probs is empty list
• Batch input → returns arrays of length B with object dtype (each element holds detections for that image)
• To return all faces unsorted, set keep_all=True when constructing MTCNN
Examples
Detect on a single PIL image, annotate and save faces:
from PIL import Image, ImageDraw
from facenet_pytorch import MTCNN, extract_face

img = Image.open('group_photo.jpg')
mtcnn = MTCNN(keep_all=True)
boxes, probs, points = mtcnn.detect(img, landmarks=True)

draw = ImageDraw.Draw(img)
for i, (box, prob, landmark) in enumerate(zip(boxes, probs, points)):
    if prob < 0.90:
        continue
    draw.rectangle(box.tolist(), outline=(0,255,0), width=3)
    for (x, y) in landmark:
        draw.ellipse((x-3, y-3, x+3, y+3), fill=(255,0,0))
    extract_face(img, box, image_size=160, margin=20,
                 save_path=f'face_{i}.png')

img.save('annotated.jpg')
Batch detection on numpy arrays:
import numpy as np
from PIL import Image
from facenet_pytorch import MTCNN

paths = ['img1.jpg', 'img2.jpg', 'img3.jpg']
imgs_np = np.stack([np.asarray(Image.open(p)) for p in paths])
mtcnn = MTCNN(keep_all=False)

boxes_batch, probs_batch = mtcnn.detect(imgs_np)
for boxes, probs in zip(boxes_batch, probs_batch):
    if len(boxes) == 0:
        print("No face")
    else:
        print("Top face box:", boxes[0], "Score:", probs[0])
Tips
• Post-process or normalize face tensors with fixed_image_standardization or prewhiten.
• Tune thresholds, factor, and min_face_size at MTCNN initialization for speed vs. recall.
Loading Pretrained Weights and Caching
Describe how InceptionResnetV1 downloads, caches, and loads pretrained weights for VGGFace2 and CASIA-Webface.
Instantiation
from facenet_pytorch import InceptionResnetV1

# Downloads and caches VGGFace2 weights under TORCH_HOME/checkpoints
model = InceptionResnetV1(pretrained='vggface2')
Under the hood, load_weights(model, 'vggface2'):
- Chooses URL for the dataset
- Determines cache dir:
torch_home = os.getenv('TORCH_HOME') \ or os.path.join(os.getenv('XDG_CACHE_HOME', '~/.cache'), 'torch') model_dir = os.path.join(os.path.expanduser(torch_home), 'checkpoints') - Creates
model_dirif missing - Downloads file via
download_url_to_fileif not present - Loads state dict with
model.load_state_dict
Invalid names raise:
ValueError: Pretrained models only exist for "vggface2" and "casia-webface"
Overriding Classification Head
By default classify=False yields L2-normalized 512-D embeddings. To get logits:
model = InceptionResnetV1(
    pretrained='casia-webface',
    classify=True,
    num_classes=150  # custom number of classes
)
If num_classes differs from original (10575), the final layer initializes randomly.
Custom Cache Location
Set TORCH_HOME or XDG_CACHE_HOME before running:
export TORCH_HOME=/mnt/data/torch_cache
export XDG_CACHE_HOME=/mnt/data/cache
python your_script.py
Practical Tips
• Re-instantiating with the same pretrained name uses the cache—no network call.
• To force redownload, delete the cached .pt in <TORCH_HOME>/checkpoints/.
• Move model to device immediately:
import torch
model = InceptionResnetV1(
    pretrained='vggface2',
    device=torch.device('cuda')
)
download_url_to_file: Robust HTTP Download with Progress and Integrity Check
Provide a reliable way to download a file over HTTP(S) into a local path, with optional SHA-256 prefix check and a progress bar. Ensures atomic writes and avoids corrupted files.
Signature
def download_url_to_file(
    url: str,
    dst: str,
    hash_prefix: Optional[str] = None,
    progress: bool = True
) -> None
Parameters
• url
– HTTP(S) URL of the file
• dst
– Full destination path (parent directories must exist)
• hash_prefix (optional)
– Hex string; downloaded file’s SHA-256 must start with this prefix
• progress (optional)
– Show tqdm progress bar if True
Key Features
• Atomic write via a temporary file in the target directory
• On-the-fly SHA-256 integrity check
• Streams in 8 KB chunks—low memory usage
• Uses Content-Length header for progress bar if available
Examples
- Download without integrity check, with progress bar
from facenet_pytorch.models.utils.download import download_url_to_file

url = 'https://example.com/models/resnet18.pth'
dst = '/home/user/checkpoints/resnet18.pth'
download_url_to_file(url, dst)
- Download with SHA-256 prefix verification
from facenet_pytorch.models.utils.download import download_url_to_file

hash_pref = '5c106cde'
download_url_to_file(
    'https://s3.amazonaws.com/pytorch/models/resnet18-5c106cde.pth',
    '/tmp/resnet18.pth',
    hash_prefix=hash_pref
)
- Suppress progress bar (e.g., in CI logs)
download_url_to_file(
    url='https://example.com/large.bin',
    dst='/data/large.bin',
    progress=False
)
Practical Tips
• Always use hash_prefix for critical assets to catch silent corruption.
• Ensure the directory for dst exists; the function won’t create parents.
• On interruption, the temporary file cleans up automatically.
Pretrained Models & Performance
This section describes available MTCNN checkpoint files, how the library downloads them automatically, and benchmark results to help you choose the right model and hardware.
Available Checkpoints
facenet-pytorch ships with three serialized PyTorch state dictionaries under data/:
- data/pnet.pt
Weights for the P-Net (Proposal Network). - data/rnet.pt
Weights for the R-Net (Refine Network). - data/onet.pt (not shown above, but also available)
Loading a Checkpoint Manually
import torch
from facenet_pytorch.models.mtcnn import PNet, RNet

# Initialize networks (specify device and channel order)
device = torch.device('cuda:0' if torch.cuda.is_available() else 'cpu')
pnet = PNet()
rnet = RNet()

# Load state dicts
pnet.load_state_dict(torch.load('data/pnet.pt', map_location=device))
rnet.load_state_dict(torch.load('data/rnet.pt', map_location=device))

# Move to device
pnet.to(device).eval()
rnet.to(device).eval()

# Example inference on a batch of images
# imgs: torch.Tensor of shape (N, 3, H, W), values in [0,1]
with torch.no_grad():
    proposals = pnet(imgs)        # returns candidate boxes
    refined   = rnet(proposals)   # refines boxes
Automatic Download Behavior
When you instantiate the high-level MTCNN detector, facenet-pytorch downloads missing checkpoints automatically into your cache directory (~/.cache/torch/hub/checkpoints/).
Example
from facenet_pytorch import MTCNN
import torch
from PIL import Image

device = torch.device('cuda:0' if torch.cuda.is_available() else 'cpu')
mtcnn = MTCNN(keep_all=True, device=device)
# On first run, this downloads pnet.pt, rnet.pt, onet.pt

img = Image.open('path/to/image.jpg')
boxes, probs = mtcnn.detect(img)
print(boxes, probs)
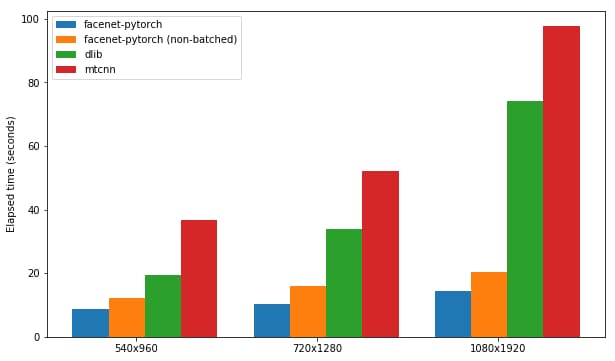
Performance Benchmarks
Benchmarks in tests/perf_test.py measure throughput (images/sec) for various batch sizes and devices. The figure below compares facenet-pytorch (batched vs non-batched) against dlib and a native MTCNN implementation.
Running the Performance Test
# Evaluate on CPU
python tests/perf_test.py --batch-size 16 --device cpu

# Evaluate on GPU
python tests/perf_test.py --batch-size 32 --device cuda:0
Key Snippet from tests/perf_test.py
import time
from torch.utils.data import DataLoader
from facenet_pytorch import MTCNN
from torchvision.datasets import ImageFolder
from torchvision import transforms

# Prepare dataset
dataset = ImageFolder('tests/data/images', transform=transforms.ToTensor())
loader = DataLoader(dataset, batch_size=args.batch_size, num_workers=4)

# Initialize detector
mtcnn = MTCNN(keep_all=True, device=args.device)

# Measure throughput
start = time.perf_counter()
for imgs, _ in loader:
    _ = mtcnn(imgs.to(args.device))
elapsed = time.perf_counter() - start
print(f'Processed {len(dataset)} images in {elapsed:.2f}s ({len(dataset)/elapsed:.2f} img/s)')
Use these benchmarks to plan hardware: on a recent GPU you can expect >100 img/s with batch sizes ≥32; CPU throughput varies around 5–20 img/s depending on batch size.
Development & Contribution Guide
This guide explains the repository layout, development environment setup, testing, CI configuration, and pull request workflow to help you get started quickly.
Repository Layout
facenet-pytorch/
facenet_pytorch/– Core modules (MTCNN, InceptionResnetV1, utilities)tests/actions_requirements.txt– Dev/test dependenciesactions_test.py– CI test suite for face detection & embeddingsperf_test.py– Performance benchmark for MTCNN
.github/workflows/python.yml– GitHub Actions CILICENSE.md– MIT License and redistribution termsREADME.md– Overview and basic usageexamples/– Sample scripts for common workflows
Setup Development Environment
- Clone the repo and enter the directory
git clone https://github.com/timesler/facenet-pytorch.git cd facenet-pytorch - Create and activate a virtual environment
python3 -m venv .venv source .venv/bin/activate - Install core and test dependencies
pip install --upgrade pip pip install torch torchvision # or desired CUDA build pip install -r tests/actions_requirements.txt - Verify installation
python -c "import facenet_pytorch; print(facenet_pytorch.__version__)"
Running the Test Suite
Run all tests with pytest:
pytest --maxfail=1 --disable-warnings -q
Run only CI validation tests (face detection & embeddings):
pytest tests/actions_test.py
Measure MTCNN performance on sample images:
python tests/perf_test.py --data-dir path/to/images --batch-size 32
Generate a coverage report locally:
coverage run -m pytest
coverage report -m
Continuous Integration
The repository uses GitHub Actions (.github/workflows/python.yml) to:
- Test on Python 3.6, 3.7, 3.8, 3.9
- Install dependencies from
actions_requirements.txt - Run
pytestandcoverage - Upload coverage results to Codecov
CI triggers on push, pull requests, or manual workflow dispatch.
Submitting Pull Requests
- Fork the repo and create a feature branch
git checkout -b feature/my-improvement - Make changes and add tests. Follow existing style and include docstrings.
- Run the full test suite and ensure coverage
pytest coverage run -m pytest - Commit your changes with a clear message
git add . git commit -m "Add X feature: brief description" - Push your branch and open a PR against
mastergit push origin feature/my-improvement - In your PR description:
- Reference any related issues (e.g. “Fixes #123”)
- Describe your change and its impact
- Confirm tests pass locally
All contributions must comply with the MIT License in LICENSE.md. Ensure you have signed any required contributor license agreements, if applicable.